For the Love of Dog
Sunday, December 1, 2013
Spiced Pumpkin Cheesecake: A New Twist on an Old Favorite
As I have professed on this blog many, many, many times before, I love all things pumpkin. So, as you might imagine, Thanksgiving, with its focus on pumpkin-filled desserts and fall flavors, is one of my favorite holidays. This year my in-laws hosted, so I got off easy on the cooking duties. I offered to bring the dessert and they asked me to bring a pumpkin pie. Although I do love a classic pumpkin pie, sometimes even I want to switch things up a bit.
Enter the spiced pumpkin cheesecake. It combines two classic desserts into one impossibly light and fluffy confection that is sure to be a hit at any holiday dinner. It was so good that no one even missed the pumpkin pie.
Spiced Pumpkin Cheesecake (Adapted from epicurious.com)
Crust
9 whole graham crackers
1/4 cup sugar
1 tsp. ground cinnamon
1/2 stick of butter, melted
Filling
4 8 oz. packages of cream cheese
1 1/2 cups sugar
3 large eggs
1 15 oz. can pure pumpkin
1/2 cup whipping cream
2 tsp. vanilla extract
2 tsp. ground cinnamon
1 tsp. ground ginger
1/2 tsp. ground nutmeg
1/2 tsp. ground allspice
1/4 tsp. ground cloves
Preheat oven to 350 F. Wrap double layer of foil around a 10 inch springform pan:
To make the crust, combine graham crackers, sugar, and cinnamon in a food processor until finely ground. Drizzle melted butter over the mixture:
Pulse the food processor repeatedly until the crumbs begin to stick together. Pour crumbs into the bottom of the springform pan and press onto the bottom of the pan to form a single layer:
Bake until crust is slightly golden (approximately 10 minutes). Transfer to wire rack and cool while preparing the filling (do not turn oven off).
To prepare the filling, beat cream cheese and sugar in a large bowl until smooth and fluffy:
Beat in eggs one at a time. Add remaining ingredients (pumpkin, whipping cream, vanilla extract, and all spices) and beat just until blended:
Pour filling into prepared crust:
Place springform pan in large baking pan and add just enough water to the baking pan to come half way up the sides of the pan:
Bake cheesecake for 90 minutes (the top of the cheesecake should be golden, as pictured at the top of the page). Transfer to a wire rack and cool, then cover, refrigerate, and allow to cool completely overnight.
Remove the sides of the springform pan before cutting and serving the cake.
Sunday, November 17, 2013
Fun With Fondant
Ok, so I think it goes without saying that it's been a long time since my last post. Sorry about that - I guess that you could say that I've been a little . . . busy.
Paul and I found out in August that we were expecting. We were so excited to break the news to my in-laws and they have been dying to find out whether we are having a boy or a girl. I wanted to think of a fun, creative, clever way to break the news, so I thought, what better way than with a gender reveal cake?
I saw all of these amazing cakes on pinterest, but all of them were covered in fondant. I was lamenting the fact that everything that I read online said that fondant is a royal pain in the butt to make from scratch when one of my co-workers informed me that you can buy pre-made fondant, roll it out, and use it. Um, what?!? How did I not know about this when I set about making the impossible present cake (click here for a refresher)? My life could have been so much easier. But at least now I'll know for the future!
After doing some research online, I discovered that people preferred the taste of Duff (from Ace of Cakes) fondant. I ordered some of the Duff fondant from Amazon, picked up some pre-colored fondant at the local grocery store, and then gave it a whirl. It was surprisingly easy to use and came out looking damn-near professional (at least compared to my usual attempts). Just call me the Ace of Cakes. ;)
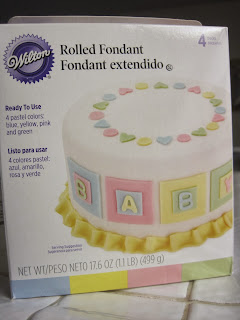
I purchased white fondant for the exterior of the cake:
When you first take it out of the package, it looks a bit frightening:
The frosted mystery cake, ready to be covered in fondant:
Once you roll the fondant out, it looks much more normal:
I used this pre-colored fondant from Wilton to make the question marks for the top of the cake, as well as the accents along the sides:
My mother-in-law cutting the cake for the big reveal:
And finally, it's a . . . .
GIRL! :)
Sunday, January 13, 2013
Potluck Perfection: Almond Roca
This weekend I was invited to not one but two potlucks. Whenever I am asked to bring something to a potluck, I'm always looking for a recipe that's easy to make but is still a crowd pleaser. Over the holidays, my sister's mother-in-law made a delicious homemade almond roca that easily fit the bill. Since I didn't have her recipe, I did a bit of internet research and found the following recipe. It wasn't just a crowd pleaser - it was an absolute show stopper. And best of all, it only took 20 minutes of active cooking time. In my opinion, that's about as close to perfection as you can get.
Almond Roca
1 lb (4 sticks) of unsalted butter
2 cups of granulated sugar
2 Tbsp of light corn syrup
6 Tbsp of water
1 cup of finely chopped almonds
1 11 oz. bag of chocolate chips
Melt butter in a medium saucepan over medium heat:
Once the butter has melted, stir in sugar, corn syrup, and water (the mixture will bubble rapidly):
Stir constantly with a wooden spoon. (If you have a candy thermometer, you'll want to cook the mixture until it reaches 290 F. I don't own one, so I cooked the mixture until it turned the color of a brown paper bag, which took approximately 20 minutes.):
Remove the mixture from heat and stir in 1/2 of the almonds:
Pour the mixture onto a greased rimmed cookie sheet:
As the mixture cools, score it using a butter knife:
Melt the chocolate over low heat and stir until smooth:
Pour the melted chocolate over the hardened almond mixture and spread to coat evenly:
Sprinkle the remaining almonds over the bark:
Place the bark in the refrigerator and allow to cool for at least 2 hours (and up to overnight):
Remove the bark from the tray and break it apart (the squares that I had scored in the bark turned out to be a bit too large, so I broke them in half).
Monday, January 7, 2013
Culinary Bucket List: Gnocchi
If there were such a thing as a "culinary bucket list", making gnocchi from scratch would be at the top of that list for me. Like risotto or souffles, gnocchi is one of those food items that approaches urban legend status among home cooks for the sheer level of difficulty that is reported to be associated with it. For years I have been tempted to try my hand at making it, but I never owned a potato ricer and I had been assured by everyone I met that attempting to make gnocchi without one would end in certain disaster.
As luck would have it, Santa saw fit to bring me a potato ricer for Christmas this year (ok, so technically it was my sister Anne, but saying that Santa brought it just makes it sound so much more magical). Since I no longer had an excuse to hide behind and I did vow to be more adventurous this year, I figured I'd give it a whirl. A few months ago I bookmarked a webpage that Bon Appetit had created with a step by step slideshow on how to make gnocchi, just in case a ricer ever found its way in to my kitchen. I used this guide as a reference and combined the tastiest sounding elements of several recipes that I found online. The rest is culinary bucket list history.
Potato Gnocchi
6 medium sized potatoes
a dash of grated nutmeg
a dash of salt
a dash of pepper
1 cup all purpose flour
1 large egg
Preheat the oven to 425 F. Prick potatoes with a fork and bake them on the center oven rack for one hour, turning them once to ensure even baking. When the potatoes are done baking, the skins will be brown and crispy:
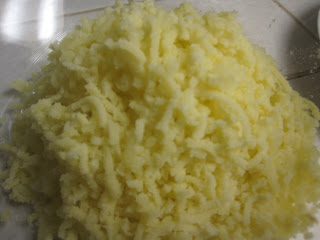
Remove the potatoes from the oven and allow them to cool for approximately 5 minutes (until they are still warm but cool enough to handle). Cut the potatoes down the center and scoop the insides out of the skins and into a potato ricer. (If you have an adjustable ricer, make sure that it is set to the finest/smallest setting.) Run the potatoes through the ricer. You should end up with fluffy mashed potatoes:
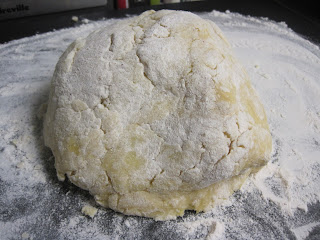
Add the nutmeg, salt, pepper, and flour and toss to coat. After all ingredients have been combined, create a well in the center of the mixture and crack the egg into it. Mix together by kneading with your hands until the dough just comes together (be careful not to over knead the dough):
Shape the dough in to a ball on a lightly floured surface. Cut the ball into four evenly sized pieces. Roll each piece between your hands and the work surface to form a 3/4-inch-thick rope:
Cut each rope into approximately 1 inch pieces using a sharp knife. Place the cut pieces on a tray in the fridge for 20 minutes.
Working in 4 batches, cook the gnocchi in salted boiling water. (The gnocchi will sink to the bottom of the pot when they are first placed in the water. When they are finished cooking, they will float to the surface.) Cooked gnocchi are delicate, so remove them from the water using a slotted spoon:
You could top these gnocchi with just about anything (pesto, marinara, brown butter, etc.) I made a roasted tomato sauce to accompany my gnocchi, as follows:
Oven Roasted Tomato Sauce
5 vine ripened tomatoes
olive oil
salt
pepper
2 cloves of minced garlic
Cut tomatoes into quarters and place in a glass baking dish. Drizzle olive oil over tomatoes and season with salt and pepper. Bake at 425 F for 45 minutes (until the tomato skins become wrinkled):
Saute garlic over medium heat in a frying pan that has been drizzled with olive oil. Place the potato ricer on the coarsest/largest setting. Spoon the oven roasted tomatoes into the ricer and crush them into the frying pan (this process will remove the tomato skins but not the seeds). Saute the tomatoes and garlic for approximately 20 minutes. Puree the mixture using a blender or food processor in order to break up the seeds and obtain a smooth consistency. Pour the blended sauce over the gnocchi, top with freshly grated parmesan cheese, and enjoy!
Subscribe to:
Posts (Atom)


